
Introducing the French Smock

It's with great excitement to announce that the French Smock pattern is live and ready to sew!
I've really enjoyed putting this pattern together and it has turned out to be the most customisable piece in our range so far. There are lots of different options to help you create your own unique version so you can really think about the kind of garment you want to make.
Due to the customisable nature of this piece it feels like a different launch with a different offering. This pattern is for home sewers who are interested in getting creative. It will require you to think actively about what you want to achieve and be curious with the options available to you. I hope it acts like a salve for winter which can feel uninspiring here in the northern hemisphere. This is really about YOUR design process, it's an opportunity to get your inner spark fired up and to scratch that creative itch!
-
This email is a 'long read' and if you're interested in making this piece I do recommend taking the time to read all of it. Please let me know if you can any questions and any feedback is always much appreciated!
Happy Friday & happy sewing,
Hetty x

Design Journey
So how did the French Smock come to be?
I designed this pattern in May of 2019 when I was running my old business Henri London, a women's clothing brand.
The way this particular design came about was a little more unusual than normal.
I had ordered some fabric for production and it arrived with much heavier stripes than expected. It was seemingly a total disaster. I knew these stripes wouldn't work with the shirt pattern I had in mind and my initial thought was that I'd have to dye the fabric or give it away.
Then over the space of a couple of weeks I started to think maybe there was another way I could use this fabric. Maybe I could come up with a new design. I started to sketch some ideas and the idea for the French Smock was born.
I decided to try and play with the stripes to create something totally new. I took inspiration from vintage French clothing and started to lay the stripes together in 3 different directions - on the grain, on the cross grain and on the bias. I found that by working WITH the stripes and not against them I could create something that looked much more balanced than a plain stripey shirt.
I finalised the design, put it into production and it personally became a favourite item in my wardrobe. Somehow the monochrome stripes that I had originally thought would clash with everything turned out to go with absolutely everything in my wardrobe.
So out of a 'disaster' came something great. And here we are 3 years later still benefitting from that initial 'disaster' moment - a nice thought to hold on to!
Towards the end of last summer I was thinking about the next design to add to the Modern Sewing Co. range of patterns. I put a few designs out on instagram stories to ask which designs were most in demand and the French Smock came out on top!
Then the next stage of development started as I knew there was so much more potential to this piece than just one option.
I started to create a new sample, I played with the front bib and created a curved edge instead of the square bib on the old version. I also added a trim around the edge to give a 3D 'lip' to the bib shape.


The combination of this curved bib and the plain white fabric also invited extra topstitching details. As I was slowly adding each piece I thought carefully about how additional lines of topstitching might compliment the structured shapes.
The choice of thread colour was an important part of this and I also layed the buttons on top to get an idea of how it would all sit together.
This is something I recommend doing as you can add more or less topstitching, add trims or no trims, bias stripes or no bias stripes depending on how the whole design balances with the fabric, buttons and thread colour.
_____
Meet the Smocks
I've made 3 variations of the French Smock to show the different pattern features. You can take your favourite elements from any of them to build your very own version.
The pdf instructions have detailed guidance on the available options to help you make your decision.

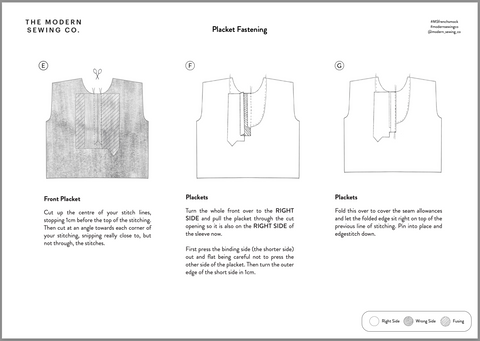
Placket & Curved Bib
This smock features the curved bib with an additional trim around the edge and the button down placket. Extra topstitching details in a contrast thread helps the features to 'pop' and the large buttons add to the overall look.
This smock features the narrow cuffs, smaller cuff plackets and narrow neck binding - these pattern pieces are recommended for lighter weight fabric such as this cotton.


Bias Stripes & Square Bib
This pattern is a great opportunity to play with a striped fabric. The stripes on the square bib are on the bias with the button down placket stripes on the cross grain along with the cuffs and sleeve plackets.
The pattern comes with 2 length options and this is the shorter option along with the cream smock above.
This fabric is a similar weight to the one above so it also features the narrow cuffs, smaller cuff plackets and narrow neck binding.


Zip Fastening
This heavier smock is make from corduroy and has slightly different features to the previous smocks. To work with the extra bulk of the corduroy this smock is cut with the longer length option and the wider cuff, bigger sleeve placket and the wider neck binding. These pieces come with 2 options - the smaller and the wider - to suit both light and heavy fabrics.
The front fastening on this piece is the zip fastening with the curved bib and it also features the curved patch pockets.


Key things to know about making the French Smock:
- PDF pattern with layers in UK sizes 4 - 28
- this is an intermediate pattern but it is an involved make. If you haven't sewn shirts before I recommend brushing up with our Over Shirt workshop. Although this is a workshop for a different pattern there are a lot of cross over points and you'll learn the higher skill techniques that will help with making your smock.
- The key area to get right is the front panel which will have your choice of bib and fastening. If you're feeling a little tentative I recommend practising this panel with some scrap fabric. Simply cut the front panel and your choice of bib/placket and have a go at putting it together. Once you're happy with your front panel the rest of the make will feel much easier.
- The front placket option is a much easier than the zip option. In the instructions I recommend the zip option for more experienced sewers due to the tiny seam allowances you have to work with.
- Spend some time thinking about your design before launching in. This piece will benefit from taking time choosing your fabric and features so luxuriate in the process and don't rush.
Preview of the instructions below: